
 I built an electric yarn winding station. Well, I assembled it, to be correct. When I bought the yarn for my wonder woman wrap in Cary, NC, USA the electric yarn winding station used in the store left a desire to someday own one of my own ;) The yarn winding station was great, It was winding all of the costumers yarn while the shop owner was still able to do other things. Now that I have seen this, I wonder why not every yarn store has one. And I wondered what kept me from having one too ;) But before I start telling you about my new winding station it makes sense to clarify what a yarn winding station is and what it is used for.
Because usually, when you buy yarn here in Europe it comes already in balls. You can instantly start knitting. So the average yarn user would never have the need for a yarn winding station. However if you buy hand dyed yarn it usually comes in skeins. And when you spin your own yarn you will first wind it into a skein, then wash it and then wind it into a ball. Yarn balls cannot be washed or dyed easily because they do no dry well. And skeins cannot be knitted from very well, trust me, I’ve tried. Everything tangled and there was no way I was able to move the skein around.
So sometimes there is the need to wind a skein into a ball. Especially when you’re also spinning your own yarn. And it comes super practical if you want to ply directly from a ball, you need to be able to ply the beginning from the outside of the ball together with the end from the inside of the ball. You can wind a ball by hand, however it is much easier to use a ball winder for that. So after I had done the whole procedure three times by hand I order a yarn winder and a swift. They were pretty cheap and made fully from plastic. And a little metal ;) I knew that eventually, that was if I decided I liked spinning, I would buy something more pretty and durable.
Two years later I did. After some internet research I found Ülle and her handmade yarn winder and swift. Ülle lives and builds yarn winders in Estonia. You just sent her an Email, get on a waiting list and in my case 3 month later I got an email saying my yarn winder an swift were ready to be shipped, I transferred Ülle the money and both items arrived here pretty quickly. I paid 18 € for shipping from Estonia to Germany, if anyone is curious.
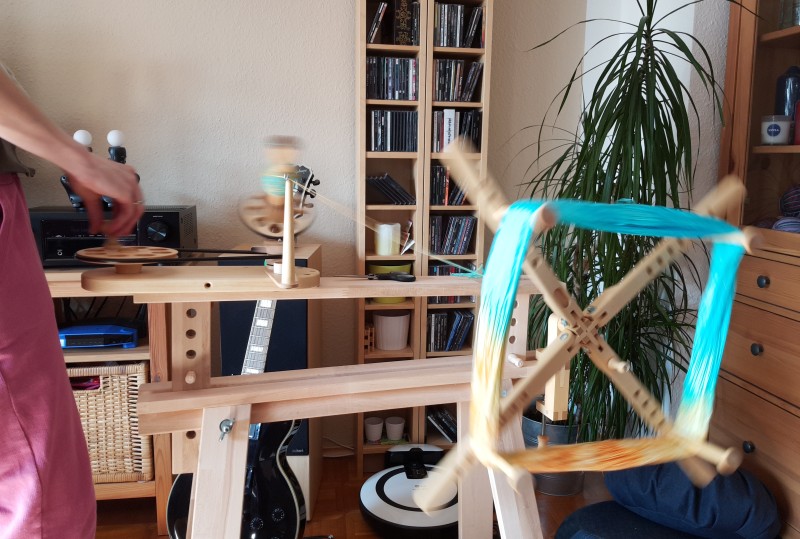
Both items needed a little assembling, but nothing serious. Yarn winder and swift are both high quality and they look and feel unbreakable, especially compared to what I used before. I had an umbrella swift before, Ülle’s swift is an Amish-Style swift (at least that is the name that I found on Wikipedia) and I think I like the Amish style swift better. Umbrella swifts have so many hinges, so that they fold up nicely, but in my opinion it makes them also more unstable and easier to break. However it is more work to adjust the Amish style swift to the strand and it takes up more room.
When I researched for yarn winders I made sure to buy something that can easily be used with a motor without destroying the winder. The PU cord drive is perfect for that. I found a similar model yarn winder manufactured by KnitPro. However is was more expensive and sold out everywhere but it looked very pretty too :)
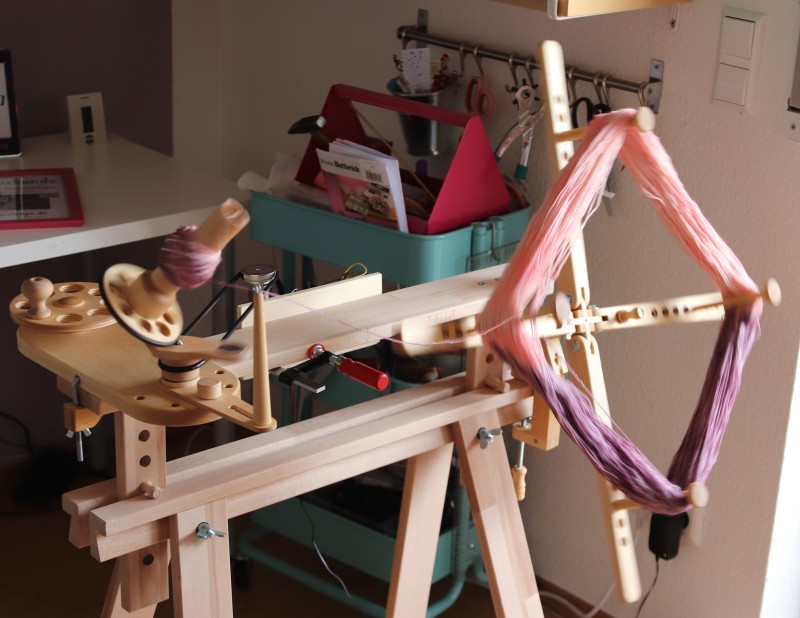
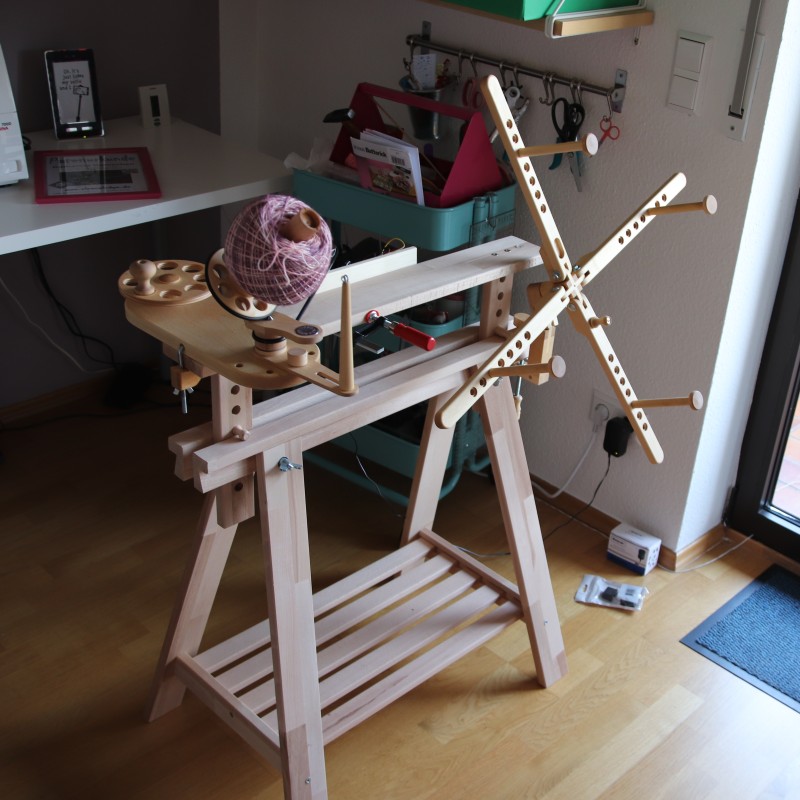
Ülle’s yarn winder is huge. I have wound 100 g skeins with it max up till now and I think it would have easily wound twice as much. The yarn winder makes a very robust impression, just as the swift does.
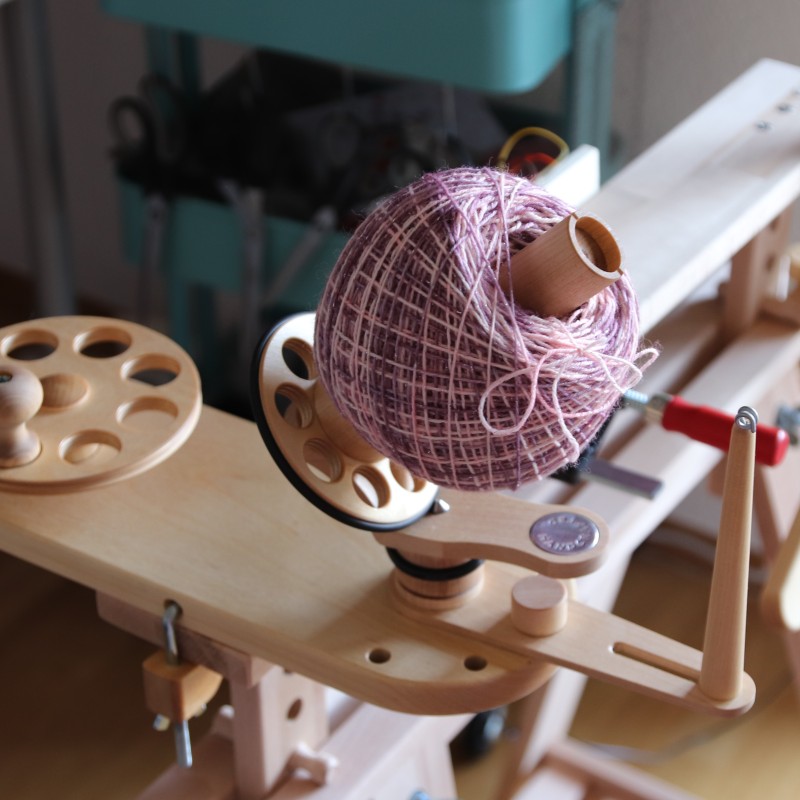
I’m very satisfied with the swift and the yarn winder, I think they are both worth the money and the wait and I suspect I won’t be needing to replace them any time soon, though they are already in pretty regular use.
Manual operation
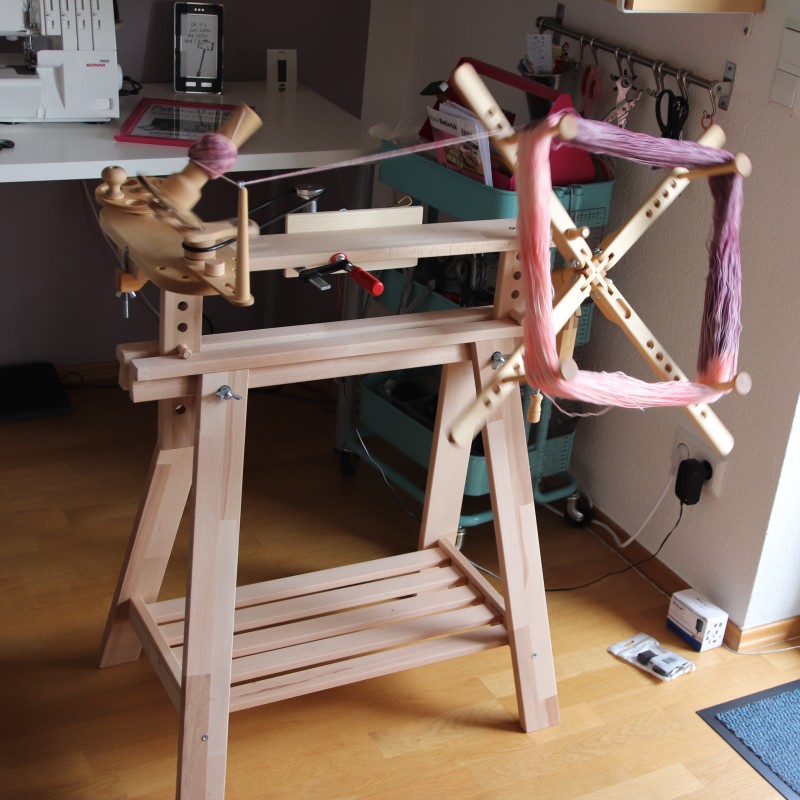
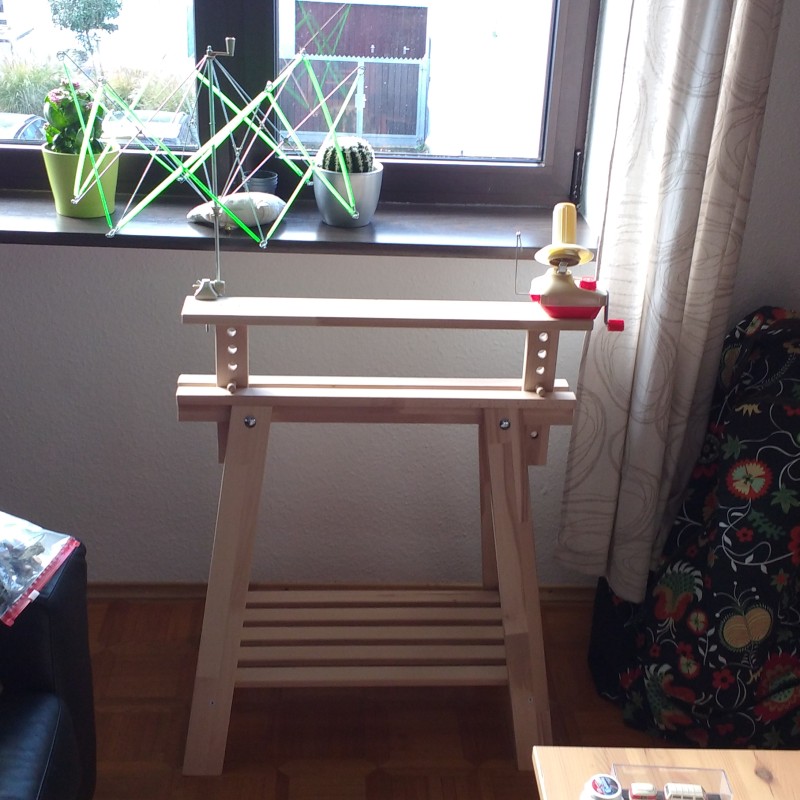
During the wait I found something else pretty interesting: the Ikea Finnvard trestle. The perfect foundation for a yarn winding station! I found Finnvard somewhere in the depth of the Raverlry forums. Somebody there posted a picture of her yarn winding station with Finnvard and said she’d heard about this trestle being used for a station in some podcast but she couldn’t remember what podcast exactly.
The trestle is a little larger than I had thought. It does take up some space. Luckily I have a whole craft room for myself, so I cannot really complain. Here is a picture of Finnvard and my old yarn winding equipment:
Now let’s get to the core of the electric yarn winding station: the electric drive! Before I started I didn’t have a clue what it would take to make this project happen. Which is admittedly a little sad. I didn’t learn that much about physics in school, there simply weren’t enough teachers and so for a long time I thought I just wasn’t that interested in physics. Even when I studied civil engineering and liked the physics parts a lot I thought that I wasn’t that much into electricity. But now I’m not so sure. Maybe I was just too low in confidence or I was lacking the basic understanding or whatever. Because let me tell you: I had a lot of fun playing around with the Arduino micro controller and a starter set that I bought to get started. Admittedly Arduino makes it very easy to start and have fun! I thought that programming the micro controller would be a lot harder. But the Arduino OpenSource IDE makes this part really easy. Even though the code must be written in C. But very basic C, really. If you are a little familiar with one programming language you won’t run into any problems here. It was Marvin’s idea to start with an Arduino board. It can do much more than I needed, but it made the project a lot easier to realize and I would recommend it to everyone.

I found it much harder to assemble all the pieces. At first I had problems to understand how to close the circuit, or I don’t know,.. I didn’t think that it was necessary to close the circuit at all. I mean I know that one has to close circuits for the electrons to flow, but somehow I was so overwhelmed that I sometimes forgot… I think :D

However the main problem was to find out what I actually needed. I needed to find the correct terms for the things I needed in order to find them. The wheel on top of the motor is called a pulley in english I think. It was much harder to figure out what the German term is: Keilriemenscheibe. I found out a lot of things, I thought the motor shafts of small dc motors all have the same diameter. Turns out they don’t ;) A great help and starting point for me was this tutorial. It explains how to build a robot car with an Arduino board, dc motors and an L298N motor driver. I needed something similar, but one motor would be enough and it only needed to be able to turn into one direction.
So with the starter pack I also ordered a 12 v dc motor with 200 rpm. The faster the motor turns the smaller is it’s force. And it turned out that 200 rpm is speedy enough and not powerful enough to tear the yarn, when something is stuck. I’m happy with my choice.
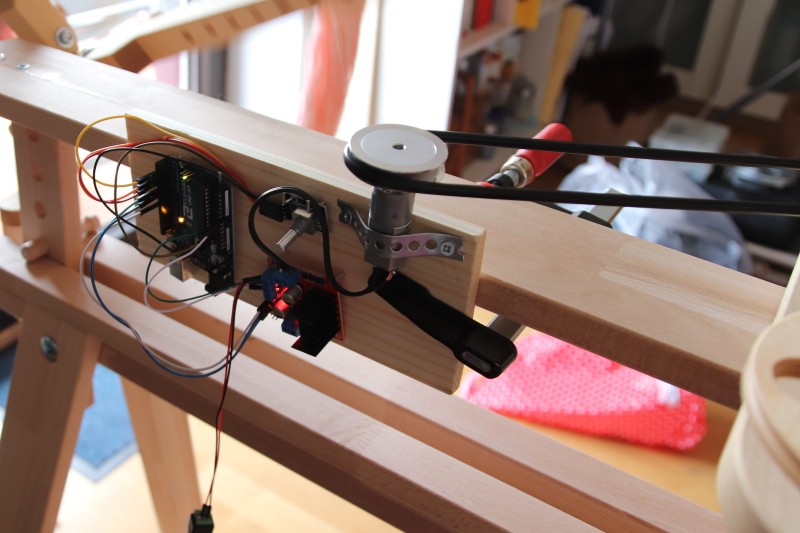
However, I started with a 3 v motor, because that was what was in the starter pack. Getting the motor to run was fun but it was clear that it wouldn’t be powerful enough. I would need an external power supply because the Arduino can only power motors with 5V. So I also ordered the motor control board L298N. It is a little more than I needed, but it really wasn’t that expensive. The L298N is powered by an external 12 V power adapter and it can even be used to power the Arduino, so I didn’t even need an additional power supply for it. When I started my first try the motor did run! When I wanted to show it off to Marvin it didn’t. Super strange. I thought I had broken something. Half an hour later Marvin saw that I forget to connect the Arduino’s ground with the L298N ground. A mistake I have made several times now…
Apart from the L298N I also connected a rotary encoder to the Arduino, to use it as input. It serves as a button, you can press it and the motor starts rotating in the slowest speed. Click it again and the rotation stops. You can turn the encoder to speed the motor up or slow it down while it is running.

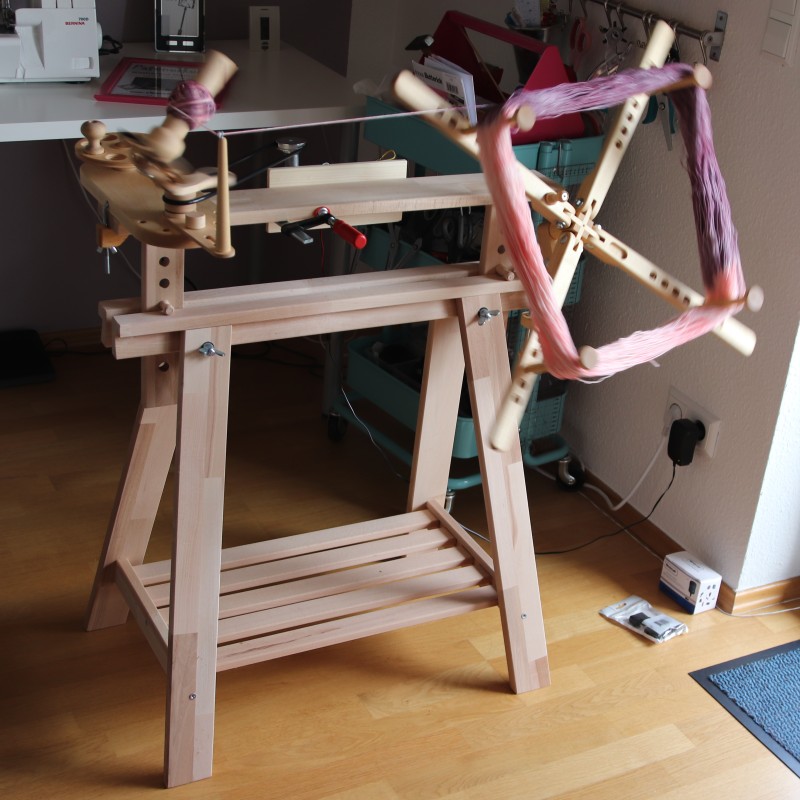
The next challenge was to attach the motor to the trestle. Marvin and I bought a wooden board and attached everything very provisional to it. We also bought a clamp to attach the board to the trestle.
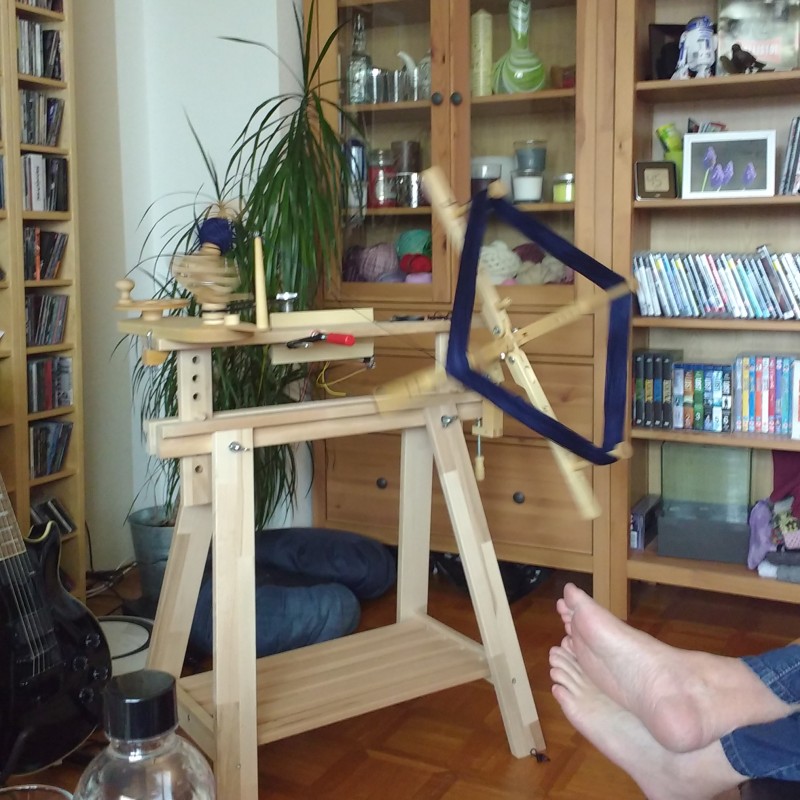
And the whole thing worked! Yay! I’m super happy with the speed and the force, it is great that I can start slow and then turn up the speed. I have wound several balls now. My parents in law visited us 2 weeks ago and we went to a yarn festival. Afterwards we sat on the sofa and watched the winding station doing it’s work. It was a lot of fun! I took a picture of the station while it was winding Susanne’s yarn and Alfred’s feet were in the camera. He said they should be in the picture to show that you can relax and put your feed up while the winding station winds for you ;)
This is, as the caption suggest, only a first prototype. I have started ordering stuff for the final version. I ordered another motor, one that has the drive on it’s back, a so called worm drive and I ordered a small wooden box where I can hide all the electronics in. Only the pulley and the rotary encoder should be visible. I already replaced the Arduino Uno by an Arduino Nano, which is much smaller. And once the final version is ready I think I will show it here together with a circuit diagram and the code I wrote.
Until then I need a new project. I thought about building something that measures the yardage of the yarn while winding. Or maybe an electric spinning wheel and my drum carder could also use a little electricity ;)
If you have any question, don’t hesitate to contact me. And if you’re thinking about buying a starter kit now: do it! :)
Macht’s gut!
Katharina
What a great winding station! I never even realized that Electric winding was possible in a small scale way. A fun post, as you related the adventure of it all.
I did get a little confused by your terminology and thought I might be able to offer some translation info. In English, what comes off a swift is a skein of yarn, and what comes off the little winder is a ball of yarn. In fact we usually call it a ball winder. That’s American English anyway, though I think British English is the same.
Thanks for so many great posts!
Thank you for clearing that up! I can see how that’s confusing, I will get it in order :) And thank you for that kind comment :)
Wow! You are amazing the way your mind thinks and connects everything together! This is just the coolest thing and I think the photo showing how you can relax while the winder winds is awesome!! :)
Thank you Lisa!
How amazing! This is genius!
This is very cool! I know about Arduinos a little bit because Luke has used them, but I never thought about applying them to yarn winding. I look forward to seeing your final version and the code!
Thank you Kirsty!
Hi Katharina,
Your arduino projects are amazing! I work in tech too, and I often feel like my spinning/knitting/spinning hobbies and my work are worlds apart, so it’s really fun to see them united so beautifully!
I want to have a go at building an electric spinning wheel too so I’m just starting to read up about Arduino. Could I ask how you learnt about it and which starter kit you bought. Did you follow the tutorials that came with the starter kit, or did you use other resources (books, youtube etc).
Thanks again for the inspiration!
Jess
Hey Jess, thank you for your kind words :)
I often feel the same about my hobbies and work being worlds apart. I think that is also partly because there are mostly men in tech and women in crafts, at least in Germany. It is rare to meet a woman in tech and even rarer when she’s into crafts as well. So I’m always happy to hear from others who are at home in both worlds too :)
I bought the Elegoo Starter Kit via amazon. Mostly because it was so much cheaper than the real Arduino starter kit. The kit came with a lot of stuff and also a lot of tutorials. I started with some basic tutorials from the kit, getting LEDs to blink and stuff. Then I tried a tutorial (also from the kit) that involved a motor, because I knew I needed a motor and then I used internet tutorials to help me figure out the details for my first project the electric yarn winder. The hardest part really was getting all the parts, because I didn’t know how the parts that I needed were even called and what to search for. Building the electric spinning wheel was then much easier. In the beginning I was sometimes really frustrated, but there is also a lot of help out there in the internet. I cannot recommend or book or Youtube channel, because I didn’t read/watch any, but I think the kit is a good starting point.
And if you get stuck or have any more questions don’t hesitate to write me and I will try to help.
Wow, thanks for your help!
I apologise for not replying earlier – I only just saw this. I think I was checking the wrong post looking for a reply. Sorry!
In the meantime, I’ve also bought an Elegoo kit. Great minds think alike :) I’ve managed to get the motor and h-bridge hooked up with a potentiometer, but it’s really unreliable. I think it’s just the potentiometer that’s poor quality. I have a much better understanding of your h-bridge problem now and why you bought so many motors. I’m finding there’s a lot to learn and so many different types of product available. I’ve read your posts about a million times now – thanks for including so much information.
I’m really enjoying it though. For me the feeling of understanding how a motor works in an electric spinning wheel isn’t that different from the feeling of finding out how the fly in a pair of jeans works, so I find it surprising that there’s so little crossover between crafts and tech. I find them both interesting for the same reason.
I hope you’re having fun with the 3d printer. Have you seen the daedalus spinning wheels?
Hi, you’re very welcome :)
I had problems with reliability too. I think the problem was always that not all devices’ grounds were connected. Sometimes the grounds have similar levels and everything works and something they don’t and nothing moves. Maybe that’s your problem too?
I’m so glad my posts are helpful to you! :)
You’re right, it is strange that there is so little crossover between crafts and tech. And I find it even stranger that crafts are so under represented in the maker community. But you know, only one way to change that! Ha!
I hadn’t seen the daedalus spinning wheels! Thanks for making me aware. Their design looks pretty similar to the latest mini electric eel wheel.
Wow, it’s amazingly similar to the eel – I hadn’t seen that one!
I’m going to have a look at grounding everything tomorrow. Hopefully it’ll make a difference.